
How to DIY your professional headshots on a budget
 By
By Learn how to take professional headshots as a beginner — from not only photographers, but also freelancers, marketers, and business owners.
30 email scripts used and curated by Sumo and AppSumo to help develop business and client relationships. Download Now
You don’t want to pay $250 for a professional headshot.
And that’s okay.
Because all you need is a phone camera, great lighting, a tripod (or a buddy), and basic photo editing skills.
In this guide, you’ll learn how to take professional headshots as a beginner. To make this as helpful as possible, I reached out to not only photographers but also freelancers, marketers, and business owners.
Let’s get started and flash those pearly whites!
What makes a good headshot
The days of posing for headshots with our arms folded are long gone. Not only does it scream cliché, but it also conveys an unapproachable message to your audience.
Did you ever see an image and think, “Hmm… This person gives me a bad vibe. Do I want to work with somebody like that?”
Yep.
What elements do you need in your professional headshots to make a great first impression? According to the freelancers and business owners I spoke to, here are the three most popular responses:
- Great lighting: Headshots with great lighting set the right tone and intensity. You can achieve beautiful lighting with natural or artificial light (e.g., ring lights).
- Photos taken from the chest up: Excellent professional photos frame the subject and make them look polished.
- Storytelling: Great professional headshots reflect what your business is about. They give the audience a hint at who you are.
How to take professional headshots in 7 steps
You know what makes a strong professional headshot, and you’re ready to learn the step-by-step process of taking one yourself. By the end of this section, you’ll have a great picture to share with your network.
Step 1. Consider your intention
Should you take your headshot against a busy or clean background?
Most of the folks I interviewed chose the latter as they felt busy backdrops create distractions, but I disagree.
Here’s what you want to do: Let your work guide you.
As Kelly Shoul, a professional wedding photographer, puts it:
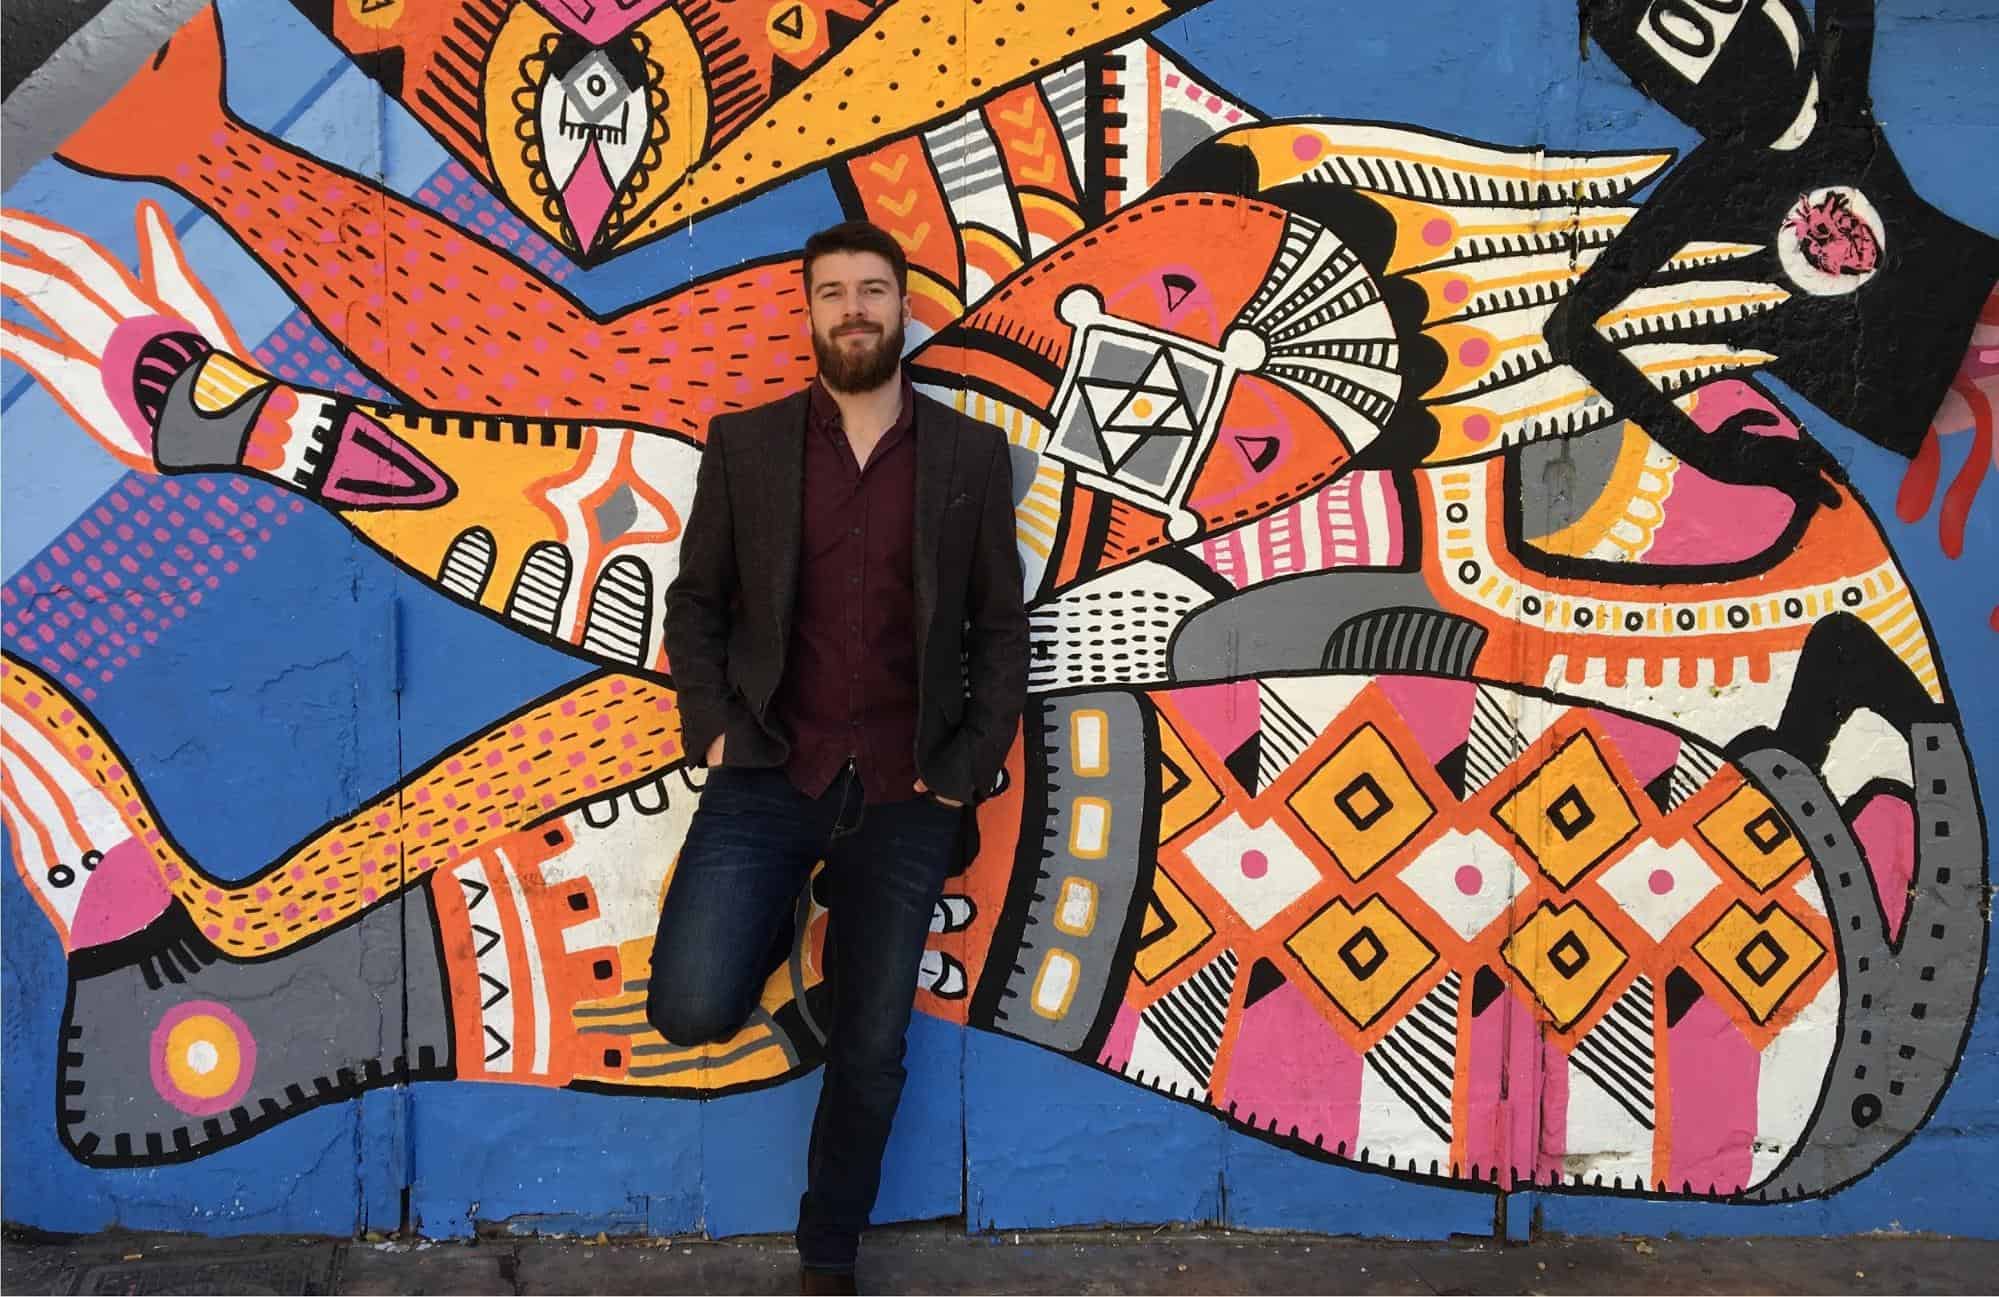
Nelson Jordan, a content strategist for SaaS and ecommerce companies, is a great example. He didn’t have a suitable space in his home (he was living in Valencia, Spain at that time), so he headed out to the city with his wife and scouted for locations.
His plan? To look for a place that matched the theme he was going for: Energy and positivity.
He ended up taking his professional bio photo with a graffiti wall as his backdrop:
Do it well, and prospects might even strike up a conversation with you!
“Some may say there’s too much going on in the background, but I’ve had several people start conversations by asking me about the graffiti and where we shot the photos.”
Nelson Jordan, content strategist for SaaS and ecommerce companies
Would the graffiti background work if Nelson were a corporate finance manager? Probably not.
But for a writer building their personal brand as a freelancer? It’s brilliant.
Step 2. Wear your best outfits
People judge us by the way we dress.
Opt for an outfit that a) complements the backdrop (e.g., Nelson’s maroon shirt and black blazer work well with the graffiti background), and b) you’re most confident in.
Here’s what Alexandra Cote, a freelance B2B content marketing consultant, wore when she took her professional bio photos:

Pro Tip: Experiment with different clothes!
“It’s a good idea to take test shots with different outfits to see which colors and textures suit you, especially if you’re going to be adding in filters.”
Alexandra Cote, freelance B2B content marketing consultant
And while you’re at it, be sure to iron your outfits. There’s nothing more unprofessional than clothes with creases and wrinkles.
Step 3. Use natural lighting
The secret to taking beautiful images? Lighting.
Katie Fellenz, Head of Marketing at Trust & Will, recommends taking advantage of natural light during the “golden hour”:
“One of the easiest ways to take a great photo is to wait until an hour before dusk. Take the headshot with natural indoor lighting or even outside in a spot where there’s not too much glare.”
Katie Fellenz, head of marketing at Trust & Will
An alternative to natural light? Artificial lights. If you have the budget to spare, invest in ring lights or smart lights. They’ll help eliminate shadows in your face and do wonders for your professional photos; you can even use them in video calls.
Step 4. Adjust brightness, focus, and more in camera settings
No DSLR? No problem.
Jason Hughes, CEO of Vegan Liftz, directed his professional headshot with the help of a friend and a mobile phone:

Settings-wise, here’s what Jason did on his phone:
- Select “Pro” mode (Tip: If you’re on Android, you can usually find this in the “More” tab when you launch your camera.)
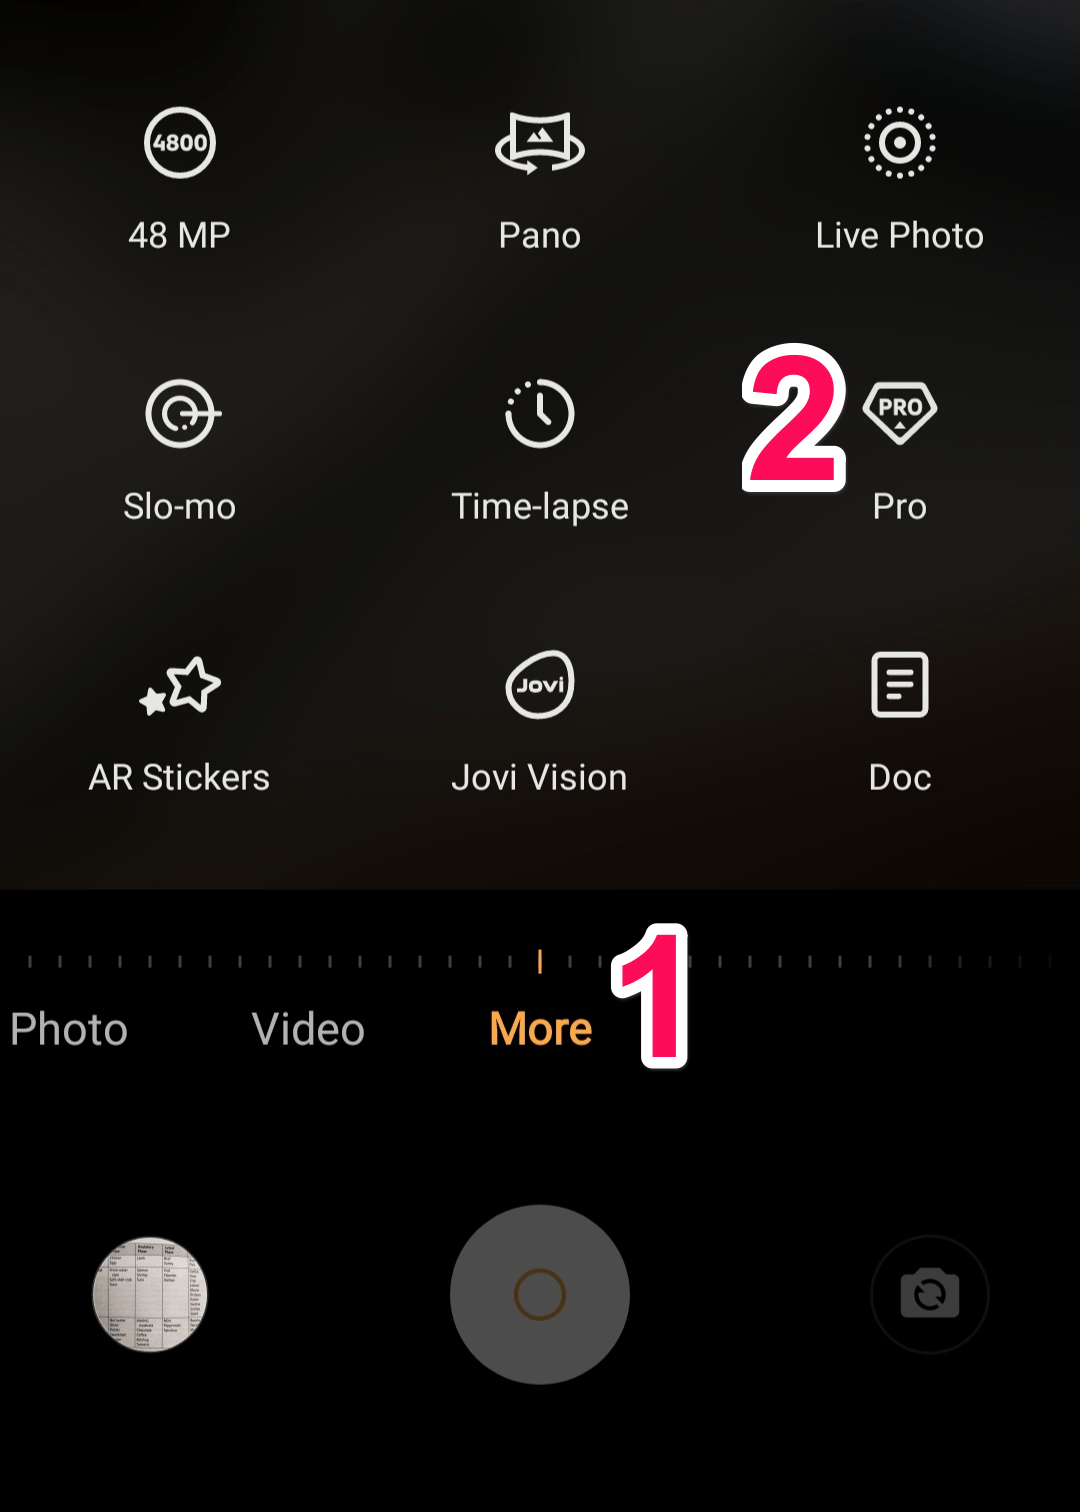
[Caption] Here’s how “Pro” mode looks like on Vivo
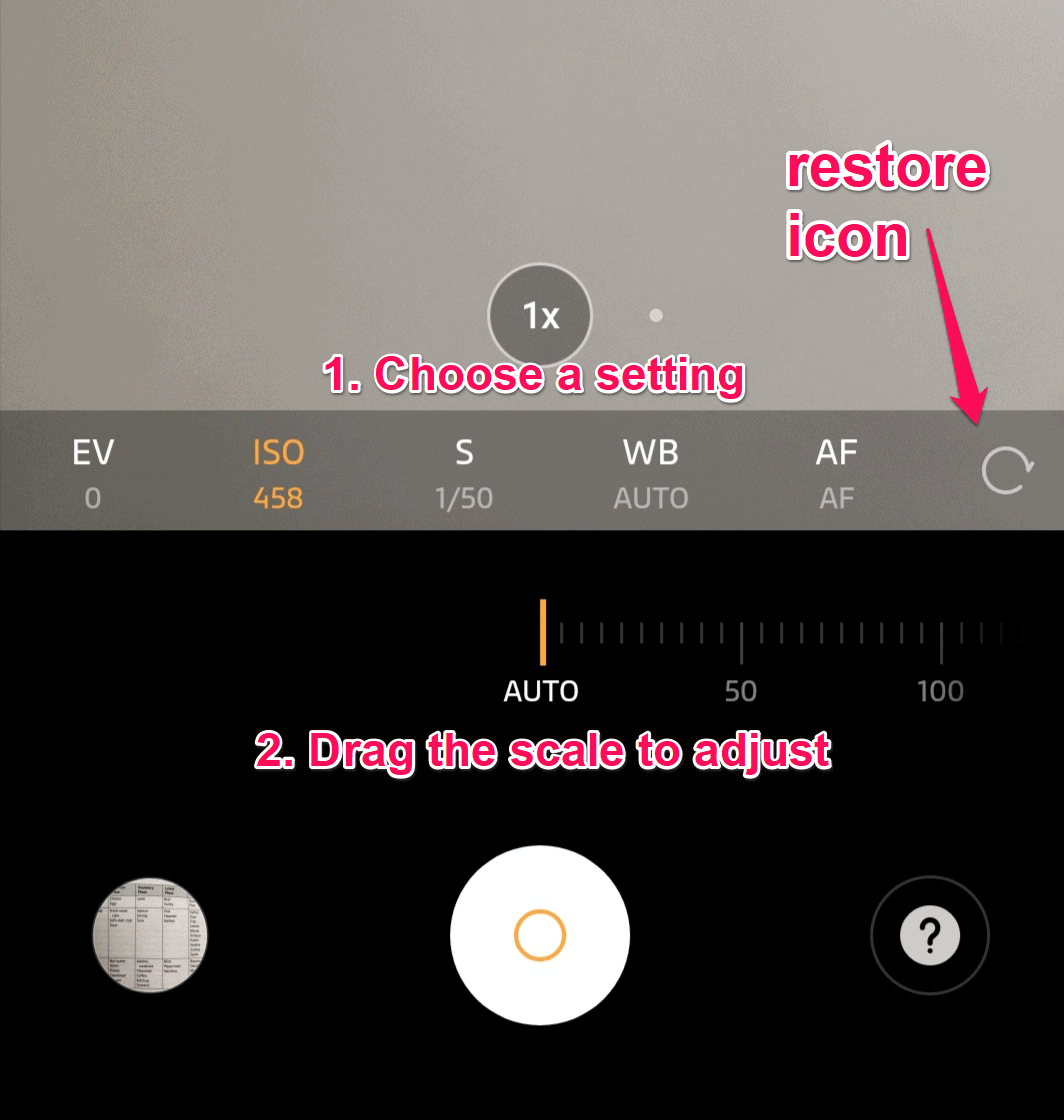
- Lower brightness to give his photos some contrast
- Adjust ISO, white balance, and focus, among others
There are no hard-and-fast rules here. Play with your camera settings and tweak them as you see fit. If you make a mistake, click the restore icon (your phone will automatically switch back to default settings) and try again.
Step 5. Take the photo
Anyone who’s taken professional headshots on their own knows this: They often look like selfies.
If you find this a pain, consider this tip from Deya Aliaga, founder of DBM Bootcamp: Make sure your phone camera is level with your eyes. This is where your tripod and remote trigger or photo buddy comes in handy!

“If you snap photos from an upper angle or a lower angle, it looks less professional and enters into the ‘selfie’ zone.”
Deya Aliaga, Founder of DBM Bootcamp
Get in position and smile! Set the timer if you’re taking the photos on your own.
And now the million-dollar question: How should you pose?
Take a leaf out of Kaleigh Moore’s book: Avoid posing.

“Look how you actually look in real life. You don’t need to look straight at the camera or be overly posed. Just try to sit comfortably and relax!”
Kaleigh Moore, Freelance writer for Ecommerce and SaaS companies
Experiment. Take a photo with you facing the camera. Or look away.
Pro Tip: Snap as many headshots as possible. You’ll have plenty of photos for the year for your marketing efforts. It’s likely you’ll end up using these avatars of different sizes for your professional and personal social media profiles.
Step 6. Edit and enhance
Next up, edit your professional headshots in a photo editing app like Snapseed or Lightroom.
Allyssa Eclarin, a product marketing manager, recommends using these apps to edit the headshots to fit the situation you’re in (e.g., gradient backdrop for social media profile).

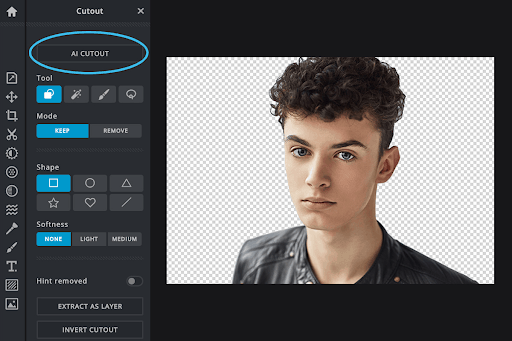
Your photo editing software doesn’t need to be expensive. If you’re looking for a powerful, affordable, and beginner-friendly tool, try Pixlr.
This browser-based photo editor offers an impressive AI cutout tool. With just one click, you can remove any object (e.g., random strand of hair) or background.
Having second thoughts about the quality of your headshots? Sometimes camera settings just don’t cut it.
With Pixlr, you can further enhance your photo by adjusting the brightness, contrast, and hue, among others.
Grab the Pixlr lifetime deal on AppSumo today for $49.
Step 7. Ask for feedback
Found your perfect headshot? Great!
What if you have multiple favorites and don’t know which photo you should choose?
Here’s an underrated tip from K.M. Robinson, a social media strategist and author: Gather your top favorite headshots and ask for feedback on social media.
K.M. Robinson, Social media strategist and author
It’ll help narrow down your choices.
Go from “This looks like a selfie” to “Damn, this looks great” with your professional headshots today
I hope this guide gave you the confidence to take professional headshots on your own!
As you can see here, even a beginner can take a great photo — all it takes is a camera, great lighting, and basic photo editing skills.
All right, let’s refresh what you’ve learned today:
- Consider your intention
- Wear your best outfits
- Use natural lighting
- Adjust brightness, focus, and more in camera settings
- Take the photo
- Edit and enhance
- Ask for feedback
Your Action: Snap away and have fun!
When you’re done, fine-tune your headshot on Pixlr. Adjust the color, remove blemishes, and amplify the tone. You’ll end up with a headshot that attracts praises.
Grab the Pixlr lifetime deal on AppSumo today for $49.